/user/dologin/?next=/p/NP0O4BRKsI/
AnonymousUser
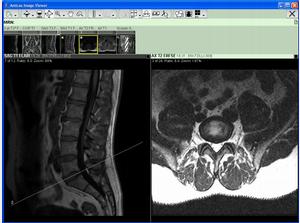
[{"fields": {"is_featured": false, "dir_size": 4920, "igdata": "what is an mri? reading an mri using the image viewer magnetic resonance imaging (mri) is a method of examining body organs through the use of magnetic fields rather than x rays, and using a computer to construct a series of body scans. an mri scan is particularly useful for producing pictures of the brain (brain mri) and spine shown here. during mri scans you lie still and are moved in and out of a narrow tube as the mri scanner creates many sectioned or sliced images of your body as shown here. this ignitable was created to demonstrate how the average patient can read their own mri. please remember this is only meant to allow you to view and understand what the doctor has explained to you. do not self diagnose, if you have doubts get a second opinion. most mri cds come with mri viewing software such as vision series by amicas. most of these viewers all work in the same manner. once the software has automatically launched from the cd, simply click "view studies from cd". this will load dashboard that allows you to search and display mri studies. you will need to load the study in order to see the results. this done by simply clicking the view button located next to the study of choice. once the study is loaded it will bring you to the amicas image viewer. here you can manipulate the images, view and study the results. first we will pick a series layout. a series layout will allow you to located exactly where each section or slice was cut in relation to a the image you are viewing. if this seems complicated don't worry, it will become clear once i show you. first select the 2x1 layout this will place two related views side by side. the line that you see here in left window is the plane or cut line that is represented by the image in the right window ...shown here notice that this window is not currently active. let's make this window active by selecting it... ...then lets change the series of images that are being shown in this window by selecting one of series sets located here. watch how the image and section line will change. first notice the section line moved over to the window that is not currently active. this is because you are using the right window to move section image displayed in left window. to move the location of section/cut plane simply select the move section command located here. then drag the line until it is over the center of the spine. notice that is will change the image shown in the left window. now the section line is directly over the center of the spine... ... while the image that you see in the left window represents exactly what you would see if you were to cut a section directly through the body at this point. now lets make the right window active... and lets change the series set viewed in the right window by selecting here. notice that section/cut plane moved to the corresponding position shown by the image in the left window. now let's move the section/cut line up the spine by selecting the move section command simply drag the mouse up the spine to move the section line. watch as the image in the left window changes relative to what would be seen at that point. dragging mouse to moving section dragging mouse to moving section dragging mouse to moving section finally we arrive at where the injury is. in this case it is a ruptured disc between l3 and l4. now lets change the contrast of the image to get a better look of the damage in the section view in the left window. if you want to zoom in simply click here. thank you for taking the time to learn how to read your mri. please remember this is only meant to allow you to view and understand what the doctor has explained to you. do not self diagnose, if you have doubts get a second opinion. <br/>", "overdue_email_after": false, "fail_retake": false, "keywords": "MRI, Amicas, Magnetic Resonance Imaging, Xray", "fail_action": "", "notification_email": false, "access_token_redemption_count": 0, "completion_type": "", "title": "Reading an MRI", "overdue_email_after_text": null, "encoded_id": "NP0O4BRKsI", "is_viewed": false, "overdue_days_email": false, "parent_id": null, "private_views": 0, "fail_email_text": null, "status": "active", "sharing": "public", "description": "This Ignitable will demonstrate how you (the patient) can read their own MRI. Please remember this is only meant to allow you to view and understand what the Doctor has explained to you. Do not self diagnose, if you have doubts get a second opinion.", "tags": [118, 119, 120, 121], "price": "0.00", "invite_message": null, "allow_score_reset": true, "igtype": "ignitable", "pass_email_text": null, "fail_popup_text": null, "podcast": false, "public_views": 71057, "notification_email_text": null, "categories": [5, 17, 18], "overdue_days_email_text": null, "pass_action": "", "notification_days_before": null, "access_token": null, "pass_popup_text": null, "pass_level": 0, "author": 46, "completion_date": null, "overdue_summary": false, "fail_retake_auto": false, "avgrating": "3.0", "directory": "129_1195674968669", "date_created": "2007-11-21T14:56:08Z", "access_token_limit": 0}, "model": "Content.ignitable", "pk": 129}]
None

